READ THESE IMPORTANT OPERATING TIPS BEFORE USING THE UNIT!
Dear Hayward Robotic Cleaner Owner! Thank you for choosing Hayward. For optimum performance, please read and follow these steps:
1. Cleaning filter cartridges should be thoroughly cleaned after each use, or as often as necessary to ensure optimum cleaning performance.
2. Before using the vacuum cleaner, and especially when opening the pool for the first time, remove large objects from the pool so that the cleaning performance does not decrease.
3. The vacuum cleaner can periodically go to the wall, but it is not necessary to rise to a vertical position. This is a normal part of the programmed cycle.
4. The vacuum cleaner can stop anywhere in the pool and start moving in the opposite direction. This is normal and is part of the programmed cycle.
5. Do not run the purifier without water. The power button should only be turned on in the “on” position when the device is fully submerged in water. The device will turn off automatically, but it is better to turn the power switch to the “OFF” position when cleaning is completed.
6. Powered by 220-240 V
7. Install the control unit of the vacuum cleaner so that it is at least 3 m from the edge of the pool. The length of a standard vacuum cleaner cable is 30 meters.
GENERAL INSTRUCTIONS FOR USE
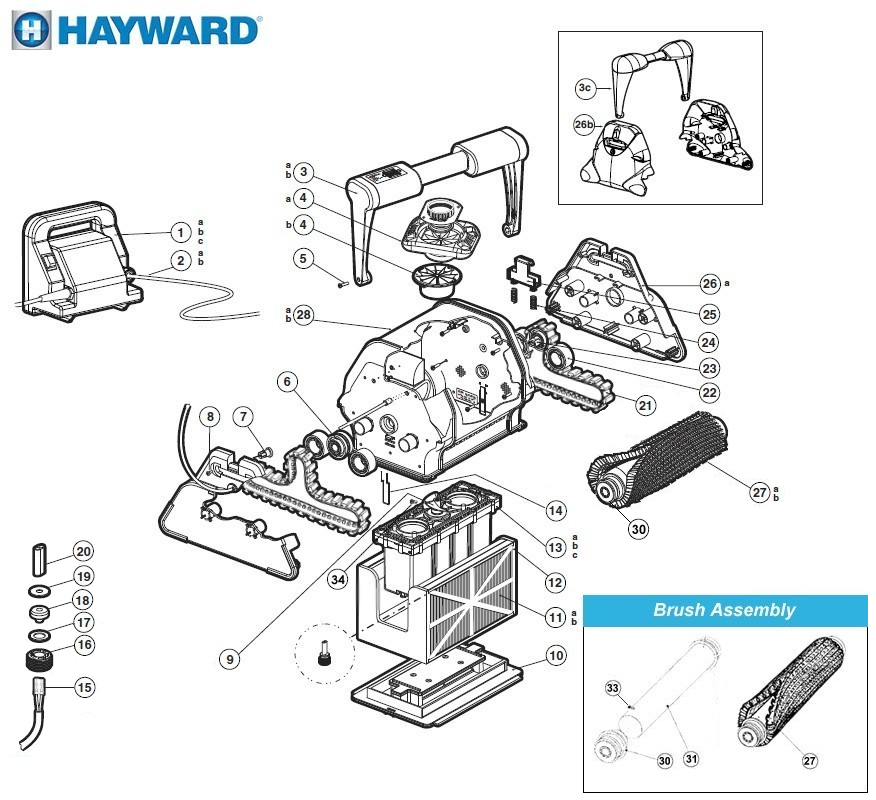
Take a moment to familiarize yourself with the TigerShark robot using the drawing on the page below.
1. Select the nearest protected network 220-240 volts.
2. Install the power supply so that the Tigershark 2 Robot Vacuum Cleaner can cover all the walls of the pool. The power supply must be at least 3 meters from the edge of the pool. The Tigershark 2 standard cable length is 30m.
3. Connect the floating cable to the power supply. Use only the original Tiger Shark charger from Hayward Pool Products.
4. Tigershark 2 has an adjustable handle. The handle must be set in a diagonal position to ensure optimum cleaning results. The handle has two diagonal positions. Change handle positions after each use to minimize cable twisting.
5. Place the Tiger Shark in the pool. It will slowly sink to the bottom of the pool as air escapes inside. Diving by hand is helpful.
6. Connect the power supply to the socket and switch the button on the control box to the “on” position. Tigershark will self-diagnose for a few minutes before starting the cleaning cycle. Attention! Do not turn the power to the “on” position when the Tiger Shark is out of the water. Doing so may damage the pump and motor drive and void the warranty.
7. The Tigershark 2 will automatically turn off after a 7 hour cleaning cycle (or 90 minutes if QC Quik Clean is selected). If your pool cleans in less than 7 hours, you can turn off the cleaner manually by turning the power to the “OFF” position. If it is necessary to start a second cleaning cycle, turn off the power for 10 seconds and restart. 8. After the pool has been cleaned, turn off the power before removing the Tiger Shark 2 Water Vacuum Cleaner from the pool. 9. Remove the robot from the water at the shallow end of the pool by pulling on the cable until the Tiger Shark reaches the surface. Then lift it out of the water with the handle, not the cable.
Caution: When winding the cable onto the spool, do not wrap it around your hand. The optimal water temperature range for the Tigershark underwater vacuum cleaner is from +10C to +38C. Take the Tigershark 2 out of the pool after each use and store it in the shade. Keeping the device in the pool continuously may result in additional maintenance.
Cleaning the Waterline Checking the Waterline Height of the Underwater Pool Vacuum Cleaner
1. Make sure the filter is clean.
2. Place the device in the pool and observe how high the waterline rises. When observing, let the device run for a few cycles so that you can get an average score.
3. At the time when the vacuum cleaner is at the waterline, pay attention if it regularly makes an excessive clicking sound with the air vent at the bottom of the inlet, or falls off the wall, and does not reverse back down, or tends to stay in the same area for a long time pool, then climbing the waterway is too high. For a visual illustration of the optimal climbing height, see the images below.
Optimal ascent; Incorrect ascent Setting of the water flow restrictor.
1. If the average lift height of your vacuum cleaner is not correct, this can be corrected by setting the stop knob.
2. Install the regulator as shown by placing the regulator into the slot and turning it clockwise to lock it in place.
3. The limiter plate may be needed if the cleaner is still climbing too high.
4. The figure shows the correct installation of the limit plate.